You might already be familiar with how things go with an email inbox. We are just talking about the spam section of your email inbox.
Believe it or not, the sender (if the sender is not a fraud) of a spam email is much more affected as compared to the receiver of that email.
If you are a marketer or a person who sends too many emails in a day, then you might have experienced a situation where your emails got bounced back with an error message on them.
But why? That’s what is getting email blacklisted. An email blacklist contains email addresses or domains that are identified to be spam or malicious. This happens most of the time with newer emails as their admin starts sending hundreds of emails in a day. Due to this, the backend computer systems identify them and put them on blacklist.
Your email address has been blacklisted by email servers for particular behaviors, which means that any emails you send will be automatically labeled as spam, even if you haven’t engaged in any harmful material sharing or spamming.
But what’s the solution, and how can you avoid ending up in an email blacklist? Let’s find out via this blog post.
What is an Email Blacklist?
An Email Blacklist, often referred to as a DNS Blacklist or Real-time Blackhole List (RBL), constitutes a database that compiles a roster of IP addresses or domain names suspected of partaking in spamming, fraudulent activities, or any conduct that contravenes accepted email practices.
These compilations are maintained and disseminated by diverse organizations and internet service providers (ISPs) vested in supervising email traffic to uphold a secure and dependable email environment.
The fundamental objective of an Email Blacklist is to forestall unwanted and potentially harmful messages from reaching their intended recipients.
Whenever an email server receives a message, it has the ability to cross-check the sender’s IP address or domain against one or more blacklists, verifying whether it bears a history of abuse or suspicious behavior.
Upon finding a match, the server might reject delivering the email or categorize the message as spam, thereby ensuring its direct route to the recipient’s spam folder and safeguarding the user from potential threats.
How do Email Blacklists operate?
The primary function of email blacklists is to evaluate the legitimacy and trustworthiness of email senders according to numerous criteria.
1. Spam Complaints
If enough people report an email as spam, the sender may be permanently blocked from sending messages.
2. Email Volume
Sending an unusually high number of emails from a particular IP address or domain within a short time span can raise suspicions of spamming.
3. Malware Distribution
Email servers involved in distributing malware or participating in phishing attempts are quickly blacklisted.
4. Unsecure Infrastructure
Email servers with inadequately configured security settings are vulnerable to misuse and may find themselves on a blacklist.
5. Known Spam Traps
Blacklist operators maintain specific email addresses that should never receive any emails. If a sender targets these addresses, they are likely to be blacklisted.
Reasons for Getting Blacklisted
For companies and organizations that rely significantly on email communication, getting blacklisted may have far-reaching effects, including but not limited to the following:
1. Reduced Deliverability
When emails originate from blacklisted sources, they are more likely to be diverted into recipients’ spam folders, diminishing the chances of crucial messages reaching their intended targets.
2. Damage to Reputation
Blacklisting can severely tarnish the reputation of a sender, fostering a sense of distrust among customers, partners, and stakeholders.
3. Decreased Productivity
Organizations facing blacklisting might experience compromised email communications, leading to hindrances in productivity and impeding essential correspondence.
4. Financial Loss
For businesses relying on email marketing campaigns, being blacklisted can result in revenue loss and a reduced return on investment.
Are You Blacklisted? Watch for These Signs
As an email user or administrator, staying vigilant about your email servers or domain status is paramount. As discussed in the previous section, timely identification of potential blacklisting is essential. Here are some common signs that you or your organization might be blacklisted:
1. Decreased Email Deliverability
A sudden decline in the number of successfully delivered emails, particularly if you typically send high volumes of legitimate emails, could be a red flag indicating blacklisting.
2. Emails Bouncing Back
Repeatedly receiving undeliverable email messages with error notifications pointing to IP or domain blocks strongly suggests blacklisting.
3. Declining Open Rates and Click-Through Rates
Blacklisted emails often find their way into recipients’ spam folders, resulting in fewer opens and clicks on your messages.
4. Spam Folder Placement
Consistently finding your emails diverted to recipients’ spam folders instead of their primary inbox is worth investigating for potential blacklisting.
5. Unusual Server Behavior
A sudden surge in email traffic or unusual server activity, such as an unexpectedly high number of failed login attempts, may be associated with blacklisting. A good quality server can handle such situations easily.
How to Check for Blacklisting?
Wondering how to check if your email server or domain is blacklisted? Just follow these steps:
1. Utilize Blacklist Checking Tools
Plenty of convenient online tools and services will help you find out if your IP address or domain is listed on any major email blacklists.
2. Keep an Eye on Email Delivery Reports
You should pay attention to metrics like bounce rates and spam complaints since they provide insights into the status of your sent emails and are provided by many email service providers.
3. Take a Peek at the Server Logs
Don’t forget to check your server logs for any unusual activity, like failed delivery attempts or abnormally high volumes of outbound emails. It could be a hint that you might be on a blacklist.
4. Consider Blacklist Monitoring Services
Subscribe to trustworthy blacklist monitoring services for extra peace of mind. They’ll keep you in the loop with real-time alerts if your IP address or domain gets blacklisted.
5. Tackle the issue Head-On
To improve your chances of getting off a blacklist if you find out you’re on one, you should investigate the underlying problem as soon as possible; this might be compromised security, spam complaints, or obsolete software.
Preventing and Resolving Blacklisting
Preventing Blacklisting
· Adopting Best Email Practices
Avoiding being blacklisted requires adopting best email practices, such as keeping software up-to-date, using strong authentication mechanisms, and correctly setting up email servers.
· Monitoring Email Sending Practices
Vigilantly observe your email-sending patterns and volume. Avoid sudden surges in email traffic and ensure that all outgoing messages comply with anti-spam regulations.
· Maintaining Opt-In Lists
Cultivate and maintain a healthy email subscriber list by obtaining explicit consent from recipients. Avoid purchasing email lists or sending unsolicited emails, as these practices can result in spam complaints and blacklisting.
· Managing Bounce and Complaint Rates
High rates of bounced emails (which indicate a high proportion of undeliverable messages) and spam complaints (which show the number of users who have reported your messages as spam) are early warning indications that your IP address may be blacklisted.
Resolving Blacklisting
· Identifying the Blacklist
If you suspect blacklisting, the initial step is identifying the specific blacklist(s) that have listed you. Many blacklist operators provide online lookup tools to check the status of your domain or IP.
· Addressing the Issue
Quickly fix the issue that caused the blacklisting, such as fixing security flaws, stopping spamming email practices, or removing malware.
· Requesting Removal
After the problem has been isolated, the next step is to ask to be taken off the blacklist by following the operator’s supplied instructions. Following these guidelines usually includes filling out a form or sending an email describing the steps taken to fix the issue.
· Monitoring and Preventing Future Listings
You may avoid getting blacklisted again by keeping a tight eye on your email-sending habits, bounce rates, and spam complaint rates even after you’ve been removed from a blacklist.
· Seeking Professional Help if Necessary
Experts in email deliverability can help you through the blacklist removal procedure and keep your email reputation in good standing if you find the prospect of managing these difficulties overwhelming.
The Bottom Line
While spam and malicious sender blacklists are necessary for email security, they can cause serious harm to users and organizations by blocking access to legitimate email servers, damaging their online reputation, and reducing their ability to get work done.
While blacklists are useful for preventing potentially harmful or annoying emails from reaching your inbox, it is important to work with blacklist operators to keep lines of communication open and quickly resolve any misunderstandings so that the sender’s good standing can be restored.
How many times does it happen when you delete a file accidentally or unintentionally make changes to that file that you didn’t want?
Well, it happens to every one of us. In fact, if you have a team working on a project that is using the same online copies of files, then multiple changes to it might be underway that can’t be easily kept in check.
But, to make things right, a version control system might help.
It is a tool that allows tracking changes in certain files over time. Whether you make a mistake on your file, delete something within the file, or a teammate makes rapid, untracked changes, all of them are recoverable and trackable by a version control system.
Given their benefits, big tech firms have started incorporating version control systems on a full scale. They allow for making changes and recovering mistakes in real-time.
With brief info on version control systems already at our disposal, let’s understand their working in detail.
What is a Version Control System (VCS)?
A VCS, a.k.a. a version control system, is a tool that allows you to change or modify the codes, digital documents, or other computer-related files in real-time and for an extended duration of time so as to make things more effortless for the entire team.
It functions as a centralized hub where revisions to files are maintained. Whether it is a reversal of changes, comparison of the database, or making modifications to the work, this feature enables users to perform changes on the go.
The Basics
Version Control operates by meticulously documenting every alteration made to files as distinct versions. Each iteration is accompanied by a timestamp and a distinct identifier, facilitating the distinction and retrieval of specific project states at various points in time.
Effective workflow, management of the codebase, and monitoring the development cycle are the whole purpose behind this process. It also enables developers to work on multiple tasks in parallel. VCS, ultimately, acts as a convenient means to examine, contrast, and comprehend the changes or modifications implemented on a certain project by the various members of the team.
There are mainly two types of VCSs: Centralized Version Control Systems (CVCS) and Distributed Version Control Systems (DVCS).
1. Centralized Version Control Systems (CVCS)
In a CVCS, all project files and their versions are stored on a centralized server. Developers interact with the server to access, edit, and commit changes to the repository. Although this configuration streamlines the collaboration among team members, it also creates the possibility of encountering failures, thereby contributing to the challenges associated with timely project completion.
2. Distributed Version Control Systems (DVCS)
A local depository is provided to each developer when it comes to DVCS, which allows them to work independently and make changes without being connected to the central server.
As a result of this, the enhancement in productivity of developers is seen as they can work offline and push the changes live whenever ready.
Why Use Version Control?
The benefits of using version control tools are countless and can’t be pondered upon with that much ease. However, here are some of them discussed briefly.
1. Teamwork
While a team is working on the same project, Interferences are bound to happen. However, VCS does not let that happen as it allows working concurrently on the same project without interfering with each other’s progress.
It allows seamless collaboration among team members so as for them to merge the changes, resolve conflicts, and maintain a consistent and up-to-date codebase.
2. Historical Tracking and Accountability
With Version Control, every change made to the project is meticulously recorded, providing a comprehensive historical view of the development timeline.
It is important because if someone denies being responsible for any kind of changes, they can be held accountable for them as there is a full history of changes available at disposable.
3. Revert to Previous Versions
Version Control enables developers to roll back to previous versions of their projects effortlessly. This ability to revert to a known, stable state safeguards against accidental data loss, errors, or unsuccessful experiments.
How Version Control Works?
The VCS tracks changes made to files and content over time. In this process, every change is recorded as a new version, including the time it was made and a special ID.
1. Repositories
At the core of Version Control lies the repository, a centralized location that stores all versions of files and content for a project.
The repository is like a database that contains all the changes that were made, along with a history of who made those changes over time. Depending on the type of Version Control System being used (CVCS or DVCS), the repository can be hosted on a central server or distributed among team members’ local machines.
2. Commits
A “commit” represents a fundamental operation in Version Control. It encapsulates a specific set of changes made to one or more files. When developers complete a task or implement a new feature, they “commit” the changes to the repository, creating a new version.
The changes that are made are put into a clear and concise summary along with a log message, thus forming a commitment.
3. Branches
Creating different paths of development within a project is possible for developers with the feature of branching. A branch is akin to a copy of the codebase that can be independently modified without affecting the main development line (often referred to as the “master” branch or the “main” branch).
With branches, developers have the option to bug fixes on the trot and do experimental tests to enhance the development process, thus avoiding any clashes with fellow team members.
4. Merges
Merging integrates changes from one branch into another, typically from a feature branch back into the primary branch. When developers complete work in a branch, they can request to merge the changes into the primary branch.
If there are no conflicts, the changes are smoothly integrated. However, if conflicts arise (when different branches modify the same lines of code), developers must resolve them before merging.
Benefits of Using Version Control Systems
Not just seamless collaboration but enhancement of the software development process is also witnessed after using Version Control Systems (VCS), which is one the biggest things in successfully completing a project. Apart from this one, other benefits include:
1. Collaboration
While working on a shared project, VC tools allow various team members to work simultaneously on the same files, whether in the codebase or online documents, and make changes or modifications to these files.
2. Historical Tracking and Accountability
Each change made to the project is meticulously recorded in the Version Control System, creating a detailed historical record. This transparency allows teams to track contributions made by team members and identify the source of bugs or issues, thus monitoring the project’s progress.
3. Revert to Previous Versions
Version Control empowers developers to easily revert to a previous project version, serving as a safety net against unintended data loss, errors, or failed experiments.
4. Branching and Parallel Development
Bug fixing can be overwhelming and mess things up with the codebase, but branching helps eradicate this problem, allowing developers to fix bugs in isolation. Therefore, a parallel development environment is built that allows teams to work on multiple things on the trot simultaneously, ultimately merging all of it when ready.
How Does Version Control Streamline Collaboration?
1. Concurrent Work
Simultaneous work on multiple things can be done with VCS, allowing developers to create their branches to work on specific tasks. Once these tasks are completed, the changes are merged back into the primary branch, thus maintaining the stable codebase.
2. Conflict Resolution
During the merging process, various conflicts can arise when multiple developers modify the same lines of code, which are efficiently resolved by VCS tools.
3. Code Review and Collaboration
Whenever required, team members can easily view and comment on the changes made by them by reviewing the codes that the version control tools allow them to.
4. Continuous Integration
Version Control seamlessly integrates with continuous deployment (CI/CD) pipelines. CI/CD processes automatically build, test, and deploy code changes from the Version Control System, enabling rapid and reliable software updates.
Exploring Common Version Control Systems
Various VCSs are available, each catering to software developers’ and teams’ diverse needs and preferences. Let’s delve into some of the main ones:
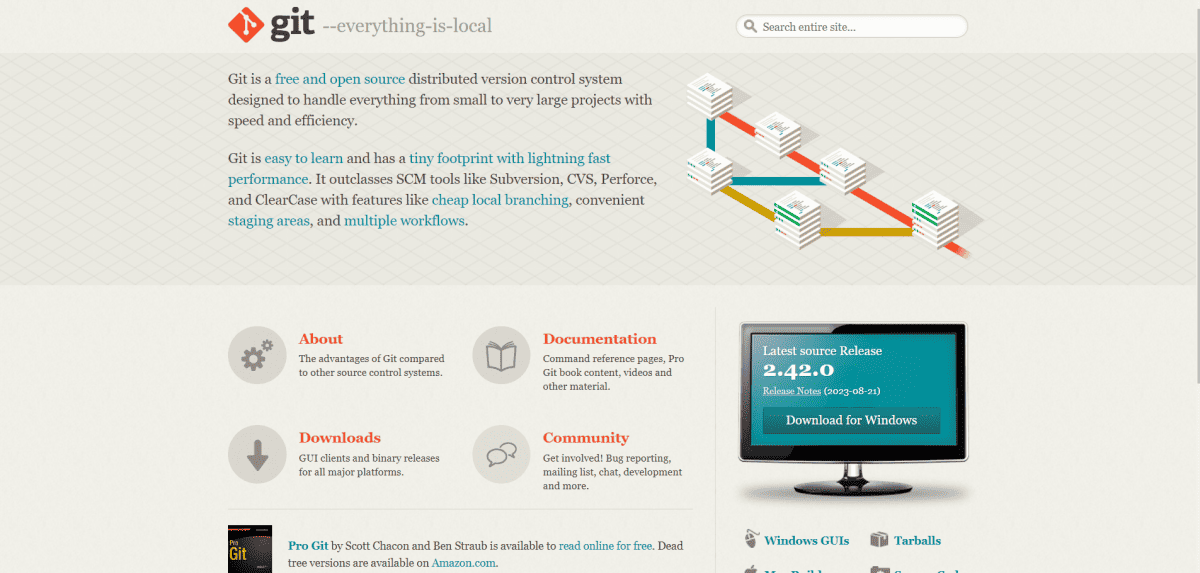
1. Git
Undoubtedly, it is the most popular and widely used DVCS worldwide. Created by Linus Torvalds in 2005, Git was designed with a focus on performance, flexibility, and reliability.
From individual developers to large organizations, Git has become the go-to choice. Its robust branching capabilities, lightning-fast operations, and strong community support contribute to its widespread adoption.
2. Subversion (SVN)
Also known as SVN, Subversion is a Centralized Version Control System (CVCS) predating Git. Initially developed as an improved successor to the Concurrent Versions System (CVS), SVN centralizes the repository, with all code changes made directly to the central server.
Though less popular than Git nowadays, SVN still finds use in some organizations and projects, especially those favoring a more traditional version control approach.
3. Mercurial
Another DVCS is similar to Git in its core functionality. While not as widely adopted as Git, certain communities prefer Mercurial for its straightforward and intuitive command structure.
4. Perforce (Helix Core)
Previously known as Perforce, Helix Core is a centralized version control system built for handling large-scale projects and massive codebases. It works at its best when in enterprise settings.
Beyond source code, Perforce has the capability to manage various types of digital assets, including binary files.
5. Microsoft Team Foundation Version Control (TFVC)
Microsoft’s Team Foundation Version Control (TFVC) is a centralized version control system integrated into Microsoft’s Team Foundation Server (TFS) and Azure DevOps Services.
While Git has gained significant traction in the industry, TFVC persists in some legacy projects or environments built around the Microsoft technology stack.
6. GitHub
Acquired by Microsoft, GitHub is a web-based platform built around Git repositories.
It allows active participation within the open source community, effectively overseeing and administering Git repositories, proficiently evaluating code, diligently monitoring and addressing bugs and features, enhancing the efficiency of CI/CD and DevOps workflows, and ensuring the integrity and safety of the code prior to committing it.
Conclusion
Given the fact that version control systems have advanced features to track all the changes and modifications made to certain files, they are a must-have tool for software development teams. While working on a project, all the team members trace their work progress, find software resolutions, and fix bugs with the help of a VC tool.
Due to its benefits, such as team empowerment, ensuring the stability of the project, and facilitation of parallel task execution, adopting a version control system is now an absolute necessity.
Regardless of whether you’re a solo developer or part of a large team, integrating a Version Control System into your workflow will undoubtedly boost productivity, streamline code management, and give a more positive development experience.
Website migrations are full of hassle, time consumption, and the end result? – unclear (if done half-heartedly).
But there’s a way that might be helpful, and that too, without any additional cost-free migration also known as free migration.
There are website hosting companies that provide free site migration services to their customers. Essentially, it means no hassle, no technical faults, and, most importantly, no breaking the bank.
A website hosting company that provides free migration services takes full responsibility for transferring the domain from one hosting server to another along with its databases, files, and all other elements.
If you are considering a website migration, then you can also opt for a free one. But before that, make sure to ask your hosting company if they provide this service or not because only reputable ones do.
Meanwhile, let’s look into free migration, starting from the basics.
What is Web Hosting Migration?
To provide the best possible experience for the website’s visitors in mind, web hosting migration is the process of moving a website and all of its associated data, files, databases, and configurations from one hosting provider to another, either within the same hosting company or to a different service.
Other than user experience, there can be various reasons behind the migration of a website. Maybe it can be to increase the overall performance of the site, or maybe scalability is in the plan, or things like implementation of advanced features and cost savings can be the reason, too.
It all depends on the business representing the site; if it has outgrown its existing hosting plans, it might be looking for a more robust solution, thus giving migration a try.
Why Is Web Hosting Migration Important?
1. To Be More Reliable and Increase Uptime
Website downtimes are something that most business sites suffer from, and amidst these situations, things often take a bad turn.
For a website to be up and running 24/7, the hosting provider that you have ties with must be reliable, thus minimizing the risk of downtime and potential loss in online revenue.
In case the current performance and uptime of the website are not that great, the best bet for you would be web hosting migration.
2. For Optimizing the Site’s Performance
The performance of a website solely depends on how fast it loads and how long a user interacts with it, therefore making optimization of a website a prominent thing to do.
A web hosting migration to a hosting provider that offers better backend hardware and fast hosting servers can improve the performance of the site, making it fast to load and allowing the users to interact with it for longer periods.
3. Scalability and Resources
Some hosting companies provide free migration services to make the upgrade to a more powerful hosting plan seamless, ensuring that your site may continue to thrive as its popularity and content expand without hitting any performance bottlenecks.
4. For Better Customer Support and Technical Assistance
What if some technical error arises on the web hosting side, and you are not able to resolve it on your own?
During these kinds of situations, responsive customer support is necessary to be at your disposal so that whatever the issue is, it gets resolved as early as possible. If not, you might think of changing your hosting provider immediately.
5. To Make Things Cost-Effective
A migration of a website not only takes time but also requires a load of money. However, not when it is free, as the potential expenses are taken care of by the hosting company itself, thus opening the doors for improved services at no additional cost.
The option of free migration allows website owners to keep a check on their budgetary requirements without compromising performance and features.
What is Free Migration in Web Hosting?
When a website is migrated by a web hosting company from one provider to another at no additional cost, the service is called free migration of a site.
The company offering this service does not take any money for it to complete and does it for free by relocating the whole website along with its files, databases, and other essential components to a new hosting environment.
To help with the migration process, the hosting providing company that is doing free migration assigns dedicated technical experts or a support team, making the transition hassle-free.
Therefore, the whole domain, including the content on the website along with its database, is transferred to the new hosting infrastructure.
Reasons Why Web Hosting Companies Offer Free Migration
It is a value-added service that most hosting companies provide to their customers so that they can make their experience smooth and help during situations of hassle. More reasons can be:
1. For Customer Retention and Attraction
Attracting new customers and retaining old ones is when web hosting companies thrive and get ahead of their competition. To do the same, they offer free migration as an add-on feature in their hosting plans.
Website owners are enticed by this offer as they do not have to face the complexities of migrating their websites on their own, thus making it an attractive option to opt for.
2. For Improvement in Customer Experience
To make the switch as easy as possible, several hosting companies now provide free migration services to their clients. In addition to increasing customer retention, this tactic also helps bring in new customers by way of positive referrals.
3. To Ensure Data Integrity
When considering the importance of their customers’ data, hosting companies must exercise extreme care. Safeguards like this ensure that no information is lost during transmission and that the website continues to function reliably and quickly at all times.
4. Eliminating Downtime with Migration
When migrating customers’ sites, reliable web hosting providers take great care to cause as little downtime as possible. Recognizing that website downtime may harm both reputation and income, they deploy strategies and technology to safeguard both.
What are the Benefits of Free Migration for Website Owners?
1. Smooth Website Transition Can Be Done
By alleviating website owners of the technical hurdles involved with web hosting transfer, free migration delivers the benefit of less stress and increased productivity. Because of this, they can focus on running their company as usual while their hosting service handles all the technical details.
2. Expert Assistance is Provided
In order to guarantee safe data transmission and limit the danger of lost information or website downtime, hosting companies that provide free migration services employ specialists with significant experience in website transfers, spanning numerous platforms, CMSs, and databases.
3. It is an efficient
Allowing the hosting provider to handle the technical intricacies of the transfer for free may help make the time-consuming process of transferring a website more efficient, particularly for novices.
4. Minimized Downtime
The user experience, search engine rankings, and income of a website are all negatively affected by downtime. Free migration hosting services prioritize reducing server downtime.
They want to keep the website up and operational during the transition. The disruption to online activity and operations is mitigated thanks to the efficiency of this procedure.
5. No Additional Expenses
Free migration’s most apparent cost-saving benefit is the absence of any extra costs for the website owner. Conducting a website migration independently could entail various expenses, such as hiring technical experts or purchasing migration tools.
However, by availing of the hosting company’s Free Migration service, all such expenses are entirely eliminated, rendering it an economical option.
6. It Enhances Return on Investment (ROI)
Consider switching to a new hosting provider if you own a website and want to improve its performance or expand your company, as a professionally managed and cost-free migration process allows website owners to swiftly redirect their focus towards optimizing the new hosting platform, potentially leading to increased financial benefits.
7. Avoiding Potential Risks
Incorrectly performed website migration can result in data loss, security vulnerabilities, and prolonged downtime, causing significant financial losses.
With reputable hosting companies offering Free Migration, website owners can mitigate such risks and ensure a secure and seamless transition to the new hosting environment.
8. It Allows Long-term Savings
Many hosting companies provide a free website transfer as an enticement to keep you as a client. Both new and returning customers profit from this, as they have access to dependable hosting and round-the-clock technical assistance that is essential to the continued financial success of their websites.
Types of Free Migration Services
Have you ever wondered how web hosting providers can make website migrations seem effortless by providing a wide range of Free Migration services that are customized to match each client’s needs?
Although the primary goal remains consistent – ensuring a smooth transfer of websites – the methods employed can vary based on the hosting company’s resources, infrastructure, and technical capabilities.
1. Automated Migration Tools
For those customers who are technically savvy and would want more say in the relocation process, hosting companies have developed automatic migration options.
Customers may initiate the transfer of their own websites by using these tools and supplying the relevant data, such as the source server information and passwords.
In response to input, the automatic tool transfers data (including files, databases, and configurations) to the new server, streamlining the procedure.
2. Manual Migration with Technical Support
Numerous hosting providers provide Free Migration with their technical help if you want a hands-off approach. In this method, experts from your hosting provider do the whole transfer by hand.
Customers can request the migration service, during which they will work closely with the support team to provide the required information and access to their current hosting setup and then allow the technical experts to execute the migration on their behalf, thereby avoiding any risks or complications that may arise.
3. cPanel or Plesk Transfer
For those currently using servers with cPanel or Plesk, some hosting companies offer Free Migration through these popular web hosting control panels.
If your website is hosted on such a server, the migration process can be made even more straightforward by leveraging the built-in transfer functionalities of cPanel or Plesk.
Backing up your site’s files and databases first allows for a smoother migration process with minimal downtime, followed by replicating the backup onto the new server prior to the move, which is especially efficient when both servers share the same administrative interface.
Limitations of Free Migration
Potential Drawbacks of Free Migration
· The Limited Scope of Migration
There might be restrictions on the free migration service provided by certain hosting providers. It’s possible, for instance, that they’ll limit the number of free website migrations you may request or refuse to work with certain websites, such as those that host a lot of products.
It is essential to carefully read the hosting provider’s terms and conditions to understand the specifics of the free migration service.
· Data Compatibility Issues May Arise
The hardware, software, and configurations of web servers are not standard, and despite the best efforts of hosting companies, there may be occasions when certain features of a website do not function as expected in the new environment, consequently causing the site’s functioning to suffer and necessitating further upkeep.
· Downtime Risks are Still There
While we make every effort to ensure a smooth relocation, there is always some degree of unpredictability involved.
Users may experience some disruption if the site goes down. Owners of websites should contact their host to find out about scheduled maintenance windows and make preparations to notify visitors in advance.
· Limited Technical Support Can Be an Issue
Most hosting providers provide some kind of migration assistance, albeit the quality of service varies widely.
Some service providers may only provide assistance during the actual move, allowing the site owners to resolve any issues that arise.
Determine the resources available to you and give some thought to the expertise you’ll need to deal with any problems that may arise.
Factors to Consider Before Opting for Free Migration
1. Make Sure to Take Backup and Secure Data
Before beginning a migration, it is imperative that site owners have a full backup of their files and databases.
While hosting companies do take precautions to prevent data loss, it’s advisable to keep a personal copy, as this backup can be used to restore the site to its previous state in case of migration issues.
2. Check for Hosting Provider’s Reputation and Reviews
Before committing to a hosting provider that offers free migration, be sure to research their reputation and read reviews from previous customers.
If you want a trouble-free migration, it’s best to go with a hosting provider that has a good reputation and a track record of satisfied customers, which you can learn about by reading reviews left by their previous clients.
3. Understand the Complexity of the Website
The difficulty of a website’s transfer is directly proportional to its own complexity. Extra care must be used when migrating a website with a huge database, an unusual configuration, or a specific application.
In order to foresee potential issues and choose the best hosting company, it is essential to assess the website’s level of complexity.
4. Consider Long-term Costs
Website owners should consider the continuing costs associated with the hosting provider, even if the initial move is free.
Attractive relocation agreements may mask higher renewal fees or hidden expenses from certain service providers. The cost and benefit of the hosting service as a whole, not simply the transfer, must be evaluated.
Tips for Successful Free Migration
If you plan to undertake a Free Migration process with your chosen web hosting provider, ensuring a smooth and successful transition requires some preparatory steps. Here are essential tips to follow:
Prepare Your Website for Migration
· Backup Your Website
Prioritize creating a comprehensive backup of your website, including all files, databases, and configurations, as this precautionary measure serves as a safety net during the migration process.
· Verify Compatibility
Ensure your website’s current platform and technologies align with the new hosting environment. Compatibility checks are crucial, especially when moving between different hosting types (e.g., shared hosting to VPS or dedicated server).
· Note DNS Settings
Keep track of your current Domain Name System (DNS) settings, including nameservers and other DNS records, to maintain website functionality during and after migration.
· Minimize Downtime
Whenever possible, schedule migration during periods of low traffic to minimize disruption for your visitors and maintain optimal availability.
· Update Website Software
Before migration, update all software, including your Content Management System (CMS), plugins, and themes. Outdated software can cause compatibility issues and security vulnerabilities during migration.
Ensure a Smooth Transition
Although Free Migration is handled by hosting provider experts, you can contribute to a seamless transition:
· Coordinate with Your Hosting Provider
Effectively communicate with your new hosting provider, providing them with all necessary information about your current website, access credentials, specific requirements, and unique configurations.
· Thoroughly Test Your Website
You must ensure that your website functions properly on the new hosting platform when the transfer process is complete. Among the things that need to be checked is whether or not all pages, forms, features, and database connections are operational.
· Monitor Website Performance
Keep a close eye on your website’s performance and responsiveness post-migration. Observe server response times, page load speeds, and any potential errors that may arise. Address performance issues promptly with your hosting provider.
· Update DNS Settings
After migration, update your DNS settings to point to the new hosting provider’s nameservers. Be mindful of DNS propagation, as it may take some time, and monitor your website’s functionality during this period.
· Retain the Old Hosting Account Temporarily
You should wait a few days once the migration is complete before canceling your previous hosting account. In case of emergency, you may still get to the data you need and evaluate it side by side.
Conclusion
Benefits accrue to both hosting companies and their customers when free migration is offered, as it is a standard feature of the modern web hosting industry.
Website owners are highly motivated to migrate to a new hosting provider if they can do so without incurring any costs, technical difficulties, or data loss, as this approach ensures a seamless website transfer, allowing them to quickly resume their work.
However, hosting providers may set themselves apart from the crowd by offering Free Migration. Putting the consumer first provides them an edge over rivals and results in more repeat business and satisfied advocates. However, business owners should choose a reliable host that provides hassle-free migration for free.
If you’ve ever been blocked from entering a website because of the dreaded “502 Bad Gateway” problem, read on; we’ll explain what it means and how to fix it.
The “502 Bad Gateway” error is an HTTP status code that indicates a communication issue between two servers. Essentially, it comes up when the server you’re trying to connect to gets a response that is invalid from the server that is hosting the content you seek.
Because 502 Bad Gateway errors can indicate more serious problems with a website’s server, it’s important to investigate their causes and implement appropriate solutions to keep visitors’ browsing experiences consistent and pleasant.
502 Bad Gateway Errors
The “502 Bad Gateway” issue is one of the most prevalent ones, and it causes users to look for an explanation of what it means and how to fix it as they browse the enormous expanse of the internet.
What is a 502 Error?
In basic terms, a 502 error is an HTTP status code that signals a problem with communication between two servers.
The internet comprises a vast network of interconnected servers, and when you visit a website, your request typically travels through multiple servers before the content reaches your browser.
The 502 Bad Gateway error is returned when an intermediary server, which acts as a gateway for data transit over the internet, meets a difficulty while attempting to complete your request.
Instead of receiving the expected response from the destination server, the gateway server receives an invalid or empty response, leading to the display of the 502 Bad Gateway error on your screen.
What Does 502 Bad Gateway Error Mean?
The 502 Bad Gateway error is like a message from the gateway server telling you that it can’t complete the request and, as a result, cannot fetch the necessary data from the destination server.
A 502 Bad Gateway error is typically caused by something outside of your control, such as the server hosting the website or the network infrastructure processing the request, and the source of the problem is usually within the server’s network or how it communicates with other servers.
What are the Causes of 502 Bad Gateway Errors?
Having some awareness of these probable reasons might help Internet users discover a solution to the annoying “502 Bad Gateway” issue more quickly and effectively, even if the error is usually caused by forces beyond their control.
1. High Website Traffic
Server overload is a common culprit behind the 502 Bad Gateway error. When websites face a sudden surge in traffic beyond their hosting server’s capacity, managing all the incoming requests becomes challenging.
Consequently, flash sales, the quick propagation of viral material, or any sudden flood of users to a website may cause delays and processing problems, resulting in gateway timeouts and generating the dreaded 502 message.
2. Proxy Server Misconfiguration
While proxy servers—which sit between clients like web browsers and destination servers—play a crucial role in bolstering security, caching data for faster access, and improving speed, communication issues between the two can arise due to incorrectly configured settings, resulting in the annoying 502 Bad Gateway error.
3. DNS Issues
The Domain Name System (DNS) is crucial in converting user-friendly domain names like “example.com” into the IP addresses computers require to find and interact with servers.
When issues arise in DNS resolution, your web browser may struggle to locate the target server linked to the website you wish to visit.
That, in turn, can result in a 502 error, as the gateway server cannot forward your request to the appropriate destination.
4. Failure of the Backend Server
A 502 Bad Gateway error might pop up due to glitches or crashes on the backend server responsible for hosting the website’s content and resources.
When the gateway server fails to properly connect with the backend server to retrieve the requested data, it responds with a 502 error to your browser.
How a 502 Bad Gateway Error Can Be Fixed?
Frustrating as it may be to see a 502 Bad Gateway problem, know that there are common methods to get your surfing experience back on track and that you may try them out below.
Clear Browser Cache and Cookies to Fix 502 Error
Below you will find instructions on clearing temporary files in popular browsers, which may be useful if you are experiencing a 502 error because of old or damaged data in your browser’s cache or cookies.
For Google Chrome
In Google Chrome, you have to enter the more tools section from the menu. Then, clear the whole browsing data along with the cookies, cached images, and other files.
For Mozilla Firefox
Enter into the options sections from the main menu. Then click on the privacy & security section and clear all the browsing data along with cookies and other cached web content.
For Microsoft Edge Browser
Make your way to the privacy section via the main menu and clear the whole browsing data along with cookies and cached files.
How to Check Error Messages and Server Logs?
If you persist in encountering the 502 Bad Gateway error, it’s possible that the problem remains rooted in the website’s server, even after you’ve cleared your browser data, and in such situations, it is advisable to examine the server logs and error messages to uncover the underlying cause of the issue.
It is important for website administrators and hosting providers to be on the lookout for signs of server overload, configuration challenges, or malfunctioning server components in order to address any issues and restore normal online functionality, as determining the cause of a 502-error message often requires access to the server.
How to Prevent 502 Bad Gateway Errors?
Prevention is always wiser. Even though you might have little control over every aspect of the websites you visit, there are measures you can adopt to minimize the likelihood of coming across a bothersome 502 error.
1. Choose Reliable Hosting Providers
If you own a website, opting for a reputable hosting provider renowned for its unwavering reliability and impressive uptime is crucial.
Selecting a well-maintained server infrastructure reduces the likelihood of encountering bothersome 502 errors.
2. Load Balancers are Something That Must Be Implemented
In high-traffic websites, load balancers play a critical role by distributing requests evenly over numerous servers, hence decreasing the frequency of 502 failures by always sending traffic to available, functional machines.
3. Regularly Update Software
Ensuring all server software, including web servers, applications, and plugins, remains up to date is paramount.
Updated software frequently brings bug fixes and security patches that can effectively thwart potential triggers of 502 errors.
4. Use Content Delivery Networks (CDNs)
Global content distribution is greatly aided by content delivery networks (CDNs), which also improve website speed and lessen the likelihood of 502 server problems.
What are Other 502 Bad Gateway Error Variations?
1. 502 Bad Gateway
The infamous 502 Bad Gateway error stands out as a prevailing instance. It emerges when the gateway server encounters an erroneous or vacant response from the upstream server, thwarting its ability to satisfy the client’s request.
Here, the gateway server is an intermediary, linking the client (typically your web browser) to the website’s backend server.
2. 502 Proxy Error
The 502 Proxy Error shares similarities with the 502 Bad Gateway error. It occurs when an intermediary proxy server forwards a client’s request to the backend server.
Acting as an intermediary for client requests, the proxy server faces challenges while attempting to connect to the origin server, leading to the generation of the 502 Proxy Error.
3. 502 Service Temporarily Overloaded
Sometimes, you might encounter a 502 error, which could appear as “502 Service Temporarily Overloaded.” When you see this version of the error, it means that the backend server is currently dealing with a lot of traffic or overload.
Because of this, users may experience intermittent access interruptions until the server recovers or traffic levels decrease; although this is just a momentary inconvenience, it may be unpleasant nevertheless.
Does a 502 Bad Gateway Affect a Website’s SEO?
While search engine optimization (SEO) is essential to a website’s exposure and traffic, a 502 Bad Gateway error may subtly damage user experience and valuable search engine rankings, possibly having a significant influence on your website’s SEO performance.
1. Bounce Rates May Increase
Encountering a 502 Bad Gateway error can frustrate users, hindering their access to your website’s content. When visitors come across this error, they are more likely to abandon the site right away, increasing bounce rates.
Since search engines like Google place a premium on delivering relevant and valuable content to users, websites with persistently high bounce rates are vulnerable to a decline in search result rankings, and a high bounce rate is one indicator that your content may not meet users’ expectations or needs.
2. Crawling and Indexing Might Be Affected
Search engine bots regularly traverse websites, diligently indexing their content to keep search results up to date. However, encountering a pesky 502 Bad Gateway error can create hurdles in this process, obstructing search engines from accessing and effectively indexing your site.
Your site’s exposure and search engine optimization (SEO) performance may suffer if crawling problems occur often, leading to insufficient indexing and the exclusion of certain pages or content.
3. SERPs Rankings Might Get Lost
If search engines have trouble accessing your site on a regular basis, they may form the impression that it is unreliable or experiencing technical difficulties, causing them to lower your site’s ranking positions and making it harder for users to discover your content through organic searches.
4. User Experience Will Get Affected Too
Search engines nowadays pay close attention to user experience signals while deciding on search rankings. Suppose a website consistently fails to provide a satisfactory user experience with frequent 502 errors, sluggish loading times, or other technical glitches.
In that case, search engines might perceive it as less beneficial to users and consequently assign it a lower position in search results. Conversely, websites that deliver a seamless and error-free experience usually fare better in search engine rankings.
5. Loss of Organic Traffic
A significant drop in organic traffic, which is essential for most websites as it comprises visitors who find your content naturally through search engines, can be the result of 502 Bad Gateway errors, which can also harm your website’s SEO performance and negatively impact your online presence.
502 Errors and Dealing with Them
Encountering a 502 Bad Gateway error might be frustrating, but you can approach it with a clearer perspective once you grasp its nature.
You can take the appropriate measures, alert the appropriate parties, and wait for the problem to be fixed if you have a firm grasp of the 502 Bad Gateway error and what it means as an HTTP status code, which essentially indicates a communication problem between servers, specifically the gateway server that is handling your request.
Errors are inevitable while navigating the web’s complex ecology of servers and networks, but with some creative problem-solving and teamwork, you can go back to enjoying the internet as it was meant to be used.
Websites are all around the internet. Every piece of content that we see online is present on a website. But how many people there are who exactly know how precisely a website works? Only a few.
That’s primarily because many complex things are going on behind the scenes. Whether it is the source code of the site, images, content, videos, or other security aspects, there are many little things that are required to make a website run smoothly.
And, out of all these, there are aspects that involve how static or dynamic a website must be.
A website is termed static in nature when its web pages are fixed, immutable, and do not change in real-time.
On the other hand, a dynamic website is exactly the opposite. The web pages of a dynamic website evolve in real-time, be it the content, images, or videos on the pages. All this information present on a dynamic website can change based on visitors’ location, their past history with the website, and occasionally their browsing preferences.
But how does all this work? How does a dynamic website change itself automatically in real time?
Well, that’s what we will find out in today’s blog post.
So, let’s start first by finding out what a static website is.
What is a Static Website?
When it comes to the internet world, a wide variety of websites can be found. However, the two fundamental types of websites are static and dynamic websites.
Each of these websites has its characteristics, working, and purposes.
A static website usually refers to one that contains web pages that are fixed, unchanged, and do not evolve. Once created and uploaded to the web server, the web pages do not change at any given time (unless any administrative change is induced).
Such websites have fixed HTML, CSS, content, elements, and other aspects, thus providing visitors with the same info every time they visit.
No server-side technologies or databases are required to run a static website, which, on the other hand, are needed in the case of a dynamic website. Static websites bar all those high technicalities by incorporating pre-defined web pages, content, and visual elements.
Who Usually Uses Static Websites?
In essence, static websites are minimal, simple, and highly reliable. Due to this reason, they are a perfect fit for solopreneurs, entrepreneurs, and other small businesses.
Another reason a static website can be handy is the technical knowledge required to maintain it, which could be much higher. You won’t have to hire any advanced development team to work on it. Neither a high maintenance budget is needed.
Static websites are straightforward to use, maintain, and update. But that does not mean they look less attractive than a dynamic website. No sir!
Some static websites look way more advanced and attractive than dynamic sites. It depends on how good of a developer you hire to get the job done.
Whether you are up for creating a portfolio site, a personal services site, a blog, or a full-blown business website, a static website can be a good option.
The good news? You can create a beautiful website without breaking the bank.
Advantages of Opting for a Static Website
1. A Static Website Offers Simplicity and Swiftness
With high loading speeds, a static website runs swiftly and ensures that everything is optimal for the users who visit the website.
Even if some users have slow internet connections, they can access a static website without any problem due to the availability of fast database queries and server-side processes.
2. They are Highly Secure
A static website is more secure than you might ever think of. They are super resilient to various brute force attacks and other vulnerabilities.
Not relying that much on database interactions makes it possible for static websites to be less vulnerable to cross-site scripting attacks and SQL injections.
3. Static Sites are Budget-Friendly
A cost-effective option is the unique selling point of static websites. Creating and hosting them is cheaper than dynamic websites, which include many technicalities that require more monetary support.
Static sites are the way to go for those with a tight budget and are not looking for much complexity.
4. They are Reliable and Have Great Uptime
Less reliance on server-side processes ensures that static websites do not experience downtime, proving them highly reliable.
The static files that make up a static site are served directly by the web server, ensuring no technical glitches or server-related downtimes are involved.
The Drawbacks of Opting for a Static Website
1. They Offer Limited Interactivity
When it comes to interactivity, static websites are just par. Real-time engagement is a thing that does not click with a static website.
The predetermined content limits the interaction of the users with the website, which does not force the visitors to engage and interact.
2. Static Websites are Hard to Maintain
The manual process of taking care of every page makes a static website to update and maintain. If there are many pages on the website, it will take a lot of effort and time.
Whether these changes include content updations, layout fixing, or editing the HTML files directly, it can be a pain and an always looming fear of messing things up.
3. Scaling Hurdles are Inevitable with Static Websites
Static websites that grow many folds in a specific time might face the challenge of scaling their now large website. What’s difficult is keeping everything consistent across all the site pages and managing content on the trot.
To deal with this situation, you should do some extra planning and be ready to put in more effort.
What is a Dynamic Website?
A dynamic website comes with real-time engagement and interactivity, as it can generate content on the fly.
The content on a dynamic site keeps changing in real-time, which is typically directly affected by various factors, such as how a user interacts with the website, the location of the user, and the server-side processing.
Who Uses Dynamic Websites?
Corporate firms, big businesses, organizations, and even individuals are the ones who use dynamic websites, all because of increasing interactivity and attracting more audiences with a personalized approach.
Online shopping stores, social media sites, diverse content management systems, job boards, discussion forums, and popular news websites use dynamic site structures to interact with their users in real-time and be appealing to them.
Advantages of a Dynamic Website
1. They are meant for High Interactivity and Personalization
Real-time interactivity is the unique selling point of dynamic websites. The content gets personalized and customized for specific users on these sites in real-time.
Factors such as a user’s personal preferences, past interactions, etc., are used only to personalize the results, thus allowing the users to better engage with the site. A dynamic website adds a personal touch so that the users get more involved and visit the website regularly.
2. With Dynamic Sites, Content Management is Easy
Unlike static websites, content management and handling the whole CMS of a dynamic website is far more accessible.
Updating, adding, or removing content takes no time and effort and does not require manual HTML editing. With this, a website can be expanded whenever required.
3. It Comes with Advanced Functionality
Dynamic websites are complex and limited. Instead, they have many advanced features that can take the website from the bottom to the top of your game.
Whether it is complicated multimedia stuff, advanced lead conversion forms, or real-time visual elements, a dynamic site has all the necessary features.
4. They are Best for Scalability
No matter how extensive the database is and how much your website is growing, a dynamic site is the best option to complete this scaling.
With high-speed servers and no signs of downtime, these websites can handle more than you think.
Disadvantages of a Dynamic Website
1. The Complexity and Development Time is High
Advanced development processes and technologies are required to create a dynamic website, which might lead to complex workflows and more time consumption.
With longer development times, it also means that there will be a higher upfront investment on the horizon, which will only turn into an ROI if the result is perfect.
2. Dynamic Websites Have Higher Hosting Requirements
The hosting solution of a complex website changes in real time and is enormous in terms of databases, so it must be more robust.
As a dynamic website requires more database interactions and complex server-side processing, its hosting plans must be premium.
3. They are Vulnerable to Security Risks
Unlike static websites, dynamic sites are more prone to security risks and are sometimes attacked with brute force, SQL injections, etc.
The reason behind these vulnerabilities is the increased reliance on user inputs and server-side technologies, which, when not secured properly, lead to attacks such as cross-site scripting (XSS), session hijacking, and SQL injections.
4. Dynamic Sites Might Face Performance Issues
If a complex dynamic site requires higher server resources, it will surely be less responsive and sluggish at the front end.
The visual elements and layout of the site might take longer to load, which can ruin user interaction. To ensure this does not happen, speed optimization and caching of the websites must be made a norm.
Exploring the Distinctions Between Static and Dynamic Websites
Static and dynamic websites differ significantly in terms of their features, functionalities, and the way they are created. To get an idea of how let’s set apart their differences:
1. Content Management System
Managing content on a dynamic site is hard, especially if the site is big and has more pages. With no automated CMS support, you might have to edit the HTML and CSS files of the website directly. It can cost you a lot of time and effort, and the threat of messing things up always looms as you will now work on the website’s source code.
Dynamic sites have well-sorted content management systems that allow content editing separate from site layout and design elements. No matter how big the area is, it will enable updating the content faster and give multiple users an option to work on the site’s back end.
2. Design Flexibility
A static website only allows designing a website once at the beginning. If changes are to be made afterward, you might have to edit the site’s layout and design elements. On top of it, all this is to be done manually, making it quite challenging to handle.
On the other hand, dynamic sites are great at design flexibility, allowing developers to handle things simultaneously. Their back end allows template creation, theme implementation, and automated content systems, making it easier to handle and process as the site becomes more page-wise.
What’s better is that dynamic sites not only update the content but customize it based on user preferences, interactions, and other dynamic data.
3. User Experience
The interactivity and user experience are limited regarding static websites, which eventually bores the users after repeatedly visiting. To keep visitors engaged and make them go from one page to another, interactive elements like forms or personalized content are required, which is impossible in a static website.
Dynamic sites are great at providing tremendous user experience and interactivity. With real-time updates, personalized content, interactive forms, and highly interactive elements, an active site creates a never-before-seen experience for the ones who visit it. As long as the user is on the site, their time is well-spent and allows them to enjoy it satisfyingly.
4. Performance and Loading Speed
A static website does not require server-side processing and database queries while loading its content, allowing it to load faster. So, whenever a user opens a static website on their browser, the server sends the HTML and CSS files straight to the browser.
On the other hand, loading can be an issue for dynamic sites. A lot goes on the server side of an active site, including fetching and processing of the data and higher server resource functioning. All this can make a website load slower, and users might feel sluggish while using the site.
5. Maintenance
If the static website is small and needs more pages, maintaining it will be easy. However, if it’s enormous and has many pages, things might go sideways, which means you won’t be able to handle that much amount of HTML and CSS files because everything is manual.
Maintaining dynamic websites is easy because of the CMS on offer, the templates of web pages implemented themes, and the plugins. With all these advanced features, content updation, back-end fixes, layout revisions, and design changes become easy.
6. Scalability
Static websites might be unable to handle vast amounts of traffic as their server-side processes are limited to a certain extent. For static sites, more visitors could mean an increased load on the website, which could result in slower performance and recurring downtimes.
Dynamic sites are fully scalable, given they are well-optimized and hosted on premium robust servers. Load-balancing, file caching, and cloud-based hosting can help scale an active site no matter how big.
A Balanced Blend: Merging Static and Dynamic Pages
A website can be built using a hybrid approach combining static and dynamic sites. The primary benefit of this approach is the usage of features that make up static and dynamic websites.
This approach involves keeping some parts of the site the same or static, while some sections are built to be dynamic so that users can interact with those sections in real time.
When static and dynamic web pages are combined, better performance, interactiveness, easy content management, and high user experience are witnessed.
Advantages of the Hybrid Approach
1. It Allows Performance Enhancement
The site’s speed will increase if elements such as headers, footers, and other essential content are static. This will improve the site’s responsiveness and the user’s browsing experience.
2. Content Management Becomes Easy
The CMS feature of a dynamic site can be helpful as it allows frequent updates of news feeds, blogs, product listings, and other content.
With a CMS, you can add, edit, or delete content in real-time without messing up the source code of the whole website.
3. It Allows More Personalization
Dynamic pages are tremendously interactive as they allow personalization of things based on user preferences, location, and behavior.
Customizing content based on user interest and relevancy for each website visitor will ultimately enhance the experience. It proves to be beneficial in keeping users interested and encouraging them to return for more content.
4. Hybrid Approach Enhances SEO
Optimizing web pages for SEO can sometimes be complex, but complexity only stands a chance if they are dynamic pages. Sites that have a hybrid model fit well into SEO and allow optimization in a detailed manner.
Whether it’s about using specific keywords in the content or implementing schema markup, dynamic features combined with static ones are the way to go.
5. It Allows Scalability
The hybrid approach is compatible with huge websites and those looking to scale.
As visitors grow, the demand for resources will also increase, which a hybrid website will fulfill from its quote of dynamic features.
Challenges of the Hybrid Approach
1. It May Lead to Development Complexity
Developing a website with a hybrid approach requires careful planning and implementing intelligent workflows.
It’s tricky because integrating static and dynamic elements requires more precision to get optimum results.
2. Maintenance Can Be Challenging
Maintaining a hybrid website with static and dynamic functionalities can make things challenging as the process requires careful execution.
All the static and dynamic elements of the site must be compatible with each other and function properly.
3. It Requires Premium Hosting
Hybrid websites can’t be hosted on low-quality servers with limited features.
These websites require advanced and premium hosting solutions as they are more sophisticated and involve higher server-side processing.
What’s the Best Option?
Many things need to be considered when deciding between a static or dynamic website.
Things like what kind of site you want to build, your budget, whether you want basic features or advanced, and your expertise in technical things.
When to Consider Building a Static Website?
You are Striving for Simplicity: A static website is the way to go if you strive for minimalism and simplicity. Whether your plan includes building a personal blog, an essential business website, or a simple portfolio site showcasing your expertise, a static site’s non-changing features and straightforwardness would perfectly align.
Your Budget is Limited: Website development consumes a lot of money, but not if things are kept simple and within the boundaries. A static site is best for doing so. With its basic requirements of backend infrastructure and low maintenance costs, you won’t have to spend vast amounts of money to get things done.
Excellent Performance is Required: Static websites are great at performance and speed because they rely less on server-side processes. Even if the targeting users have slow internet connections, a static website will load fast, making it an excellent option for website creation.
You Need High Security: No matter what channel or platform you are involved in online, security is undoubtedly the first thing that must never be overlooked. When it comes to static sites, their security department is indeed a great one. With minimal interference from server-side processing, the potential security vulnerabilities are reduced.
When a Dynamic Website Would Be a Good Option?
You Need Interactive User Experience: If you want to make your website highly interactive and engage the visiting users for a long time, then dynamic websites are a good option. These sites offer great features, including comment sections, real-time personalized content, interactive forms, and other e-commerce functionalities.
Frequent Content Updates Are a Part of Your Strategy: If the type of website you are about to build is a news site or any other site with a diverse content calendar, then a dynamic site will perfectly align with that one. The CMS of an active site can manage and update vast amounts of content on the trot, ultimately saving time and effort.
You are Looking for Scalability in the Future: If the plan is to build a site and scale it at some point in time in the future, dynamic sites are great for this purpose. No matter your grand ambitions, they allow you to scale things and give you the flexibility to do whatever you want.
You Need Development Flexibility: With their advanced features, Dynamic sites give you broad flexibility at the development end and allow you to try new things you haven’t before. Whether it’s about integrating advanced web applications or customizing things, you can do it without messing things up.
Hybrid Approach – Combining Static and Dynamic Elements
A hybrid approach that uses both a static site and dynamic functionalities can give you something better. It is like a mix of static and dynamic elements, which work together to make things run smoothly while simultaneously keeping things simple.
For instance, you have a hybrid website with some pages that always stay the same or static, and at the same time, you have some pages that change in real-time based on the user preferences and to make things personalized for them.
Conclusion
Static and dynamic websites do seem similar to each other, but they’re not. They look and work differently than anyone can imagine and, at the same time, have their strengths and weaknesses.
Whether you want to build a personal blog or a small business site that looks simple, a static site is a perfect option. Its efficient functionalities, speed, reliability, affordability, and security options are also some of the things that characterize it.
Dynamic sites are opposite to static sites because of their advanced functionalities. They are a perfect combination of interactivity, flexibility, and scalability, which makes them useful for advanced and complex projects.
Apart from the benefits, the limitations of static and dynamic sites we discussed must always be noticed, as these drawbacks will play a significant role in your final call to select the correct type of website.
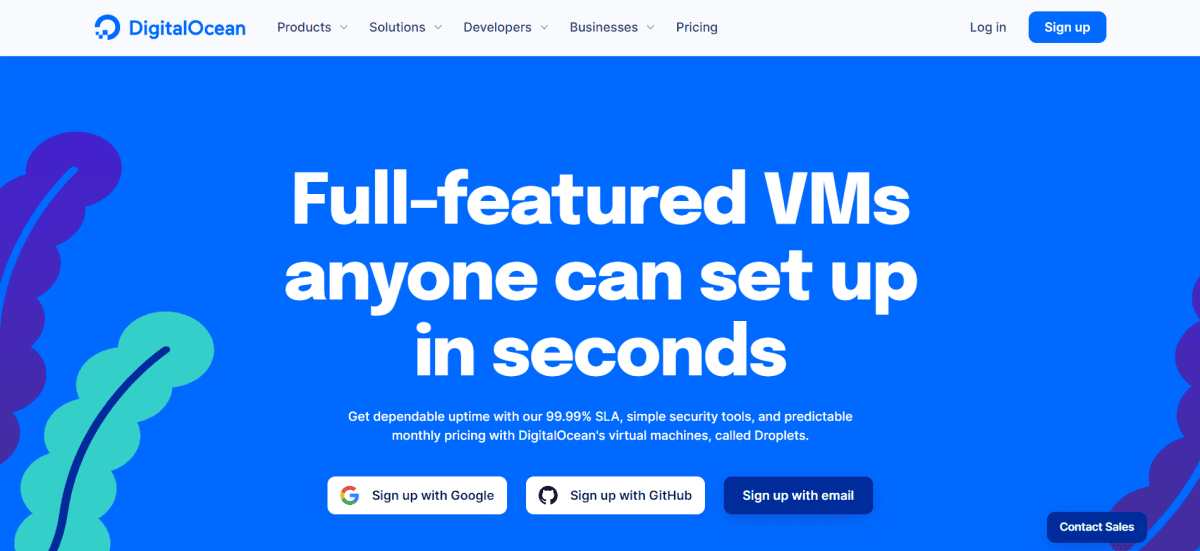
When it comes to web hosting options available today DigitalOcean stands out as a strong contender, with its hosting services and advanced technology. In this DigitalOcean review, we will explore both its strengths and weaknesses. This will help you determine if DigitalOcean is fit for your hosting needs.
If you have experience with Linux you’ll find DigitalOcean particularly beneficial. So let’s delve into the details and see if DigitalOcean is the solution for your hosting requirements!
What is DigitalOcean?
DigitalOcean was established in 2012. It has since become a leading cloud hosting solution that caters all types of developers. With headquarters located in New York, Cambridge (Massachusetts), and Bangalore (India) and an extensive network of data centers spread across New York, San Francisco, Amsterdam, Singapore, Frankfurt, London, Bangalore and Toronto. It has solidified itself as one of the largest global providers of cloud hosting.
DigitalOcean is highly regarded for its features and tools that are developer-friendly in nature. This makes it an ideal choice among cloud hosting platforms. DigitalOcean offers a robust infrastructure that is reliable enough to host websites, applications, and other digital projects.
DigitalOcean is the best choice, for businesses of any size in need of cloud hosting services due to its user-friendly interface, extensive documentation, and efficient customer support. Our review of DigitalOcean has listed some of its main pros and cons
Pros of DitialOcean
Developer Focused Approach Scalability and Flexibility Global Data Centers Cost Solutions One Click Apps
Cons of DitialOcean
Limited Windows Support Limited Load Balancing Options
DigitalOcean Review Based on Features
DigitalOcean offers a range of powerful features that cater to the needs of developers and businesses alike. Let’s explore some of its standout offerings in this review of DigitalOcean;
Robust Infrastructure
DigitalOcean prides itself on providing a scalable infrastructure that ensures smooth performance for websites and applications. With data centers located across various important locations, users can select the most suitable server location for their specific requirements resulting in reduced latency and improved accessibility for audiences worldwide.
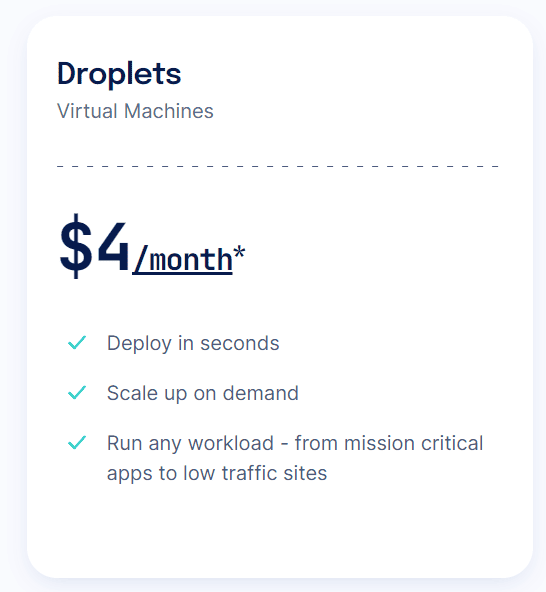
Droplets: Effortless Deployment of Virtual Machines
At the core of DigitalOceans offerings are “Droplets ” which are machines that enable users to efficiently deploy and manage their applications. By utilizing Droplets users have the flexibility to choose from operating systems such, as Linux distributions, FreeBSD, or even pre-configured application templates called “One Click Apps.”
Flexibility
In our DigitalOcean review, we found that the flexibility provided by DigitalOcean allows developers to customize their servers according to their needs. The platform excels, in offering scalability making it easy for users to adjust resources based on their requirements.
Whether it’s resizing Droplets or utilizing Kubernetes container orchestration businesses can efficiently manage fluctuations in website traffic or application demands.
Developer-Friendly Tools and APIs
DigitalOcean is dedicated to providing a cloud platform that’s developer-friendly offering a range of tools and APIs tailored for developers. These tools and APIs make it convenient for developers to automate processes such as server provisioning, configuration, and monitoring.
Block Storage and Object Storage
When it comes to storage solutions DigitalOceans Block Storage allows users to attach storage volumes to their Droplets without the need for modifying the server’s resources. This increases storage capacity as needed. Additionally, Object Storage (Spaces) provides a cost solution for storing and serving amounts of unstructured data like images, videos, and backups.
Managed Databases
To simplify database management tasks DigitalOcean offers its Managed Databases service. This service provides managed database solutions for databases such, as PostgreSQL, MySQL, and Redis. By taking care of database maintenance tasks developers can focus more on building applications without worrying about the intricacies of managing databases.
Networking Features
DigitalOcean offers networking capabilities, including floating IPs, private networking and virtual private clouds (VPC). These features allow users to create isolated network environments enabling communication, between different parts of an application and enhancing security measures.
Team Collaboration and Access Management
DigitalOceans Team Accounts and Role Based Access Control (RBAC) make it easy for businesses to efficiently manage team collaboration and control access to resources. This feature ensures organization and security by granting team members access to the specific resources they need.
In summary, DigitalOcean provides a range of features that cater to developers who are looking for a scalable and user-friendly cloud hosting platform. From effortless server deployment with Droplets to robust networking capabilities and managed database solutions DigitalOcean empowers businesses and developers to.
In our review of DigitalOcean, we found that its interface helps in deploying applications efficiently while offering the flexibility needed to adapt as requirements change. Whether you’re a developer or just starting your journey DigitalOcean offers the tools and infrastructure necessary to effectively support your projects.
DigitalOcean Pricing: Affordable and Transparent Cloud Hosting
Flexible Pricing Model
DigitalOcean offers a flexible pricing structure that allows users to choose between pay-as-you-go rates or fixed plans. The pricing model is transparent ensuring that users have visibility, into their costs.
DigitalOcean allows businesses to adjust their expenses according to their usage of resources and effortlessly expand their infrastructure as needed.
Basic Droplets
For those who have requirements, DigitalOceans Basic Droplets offer a cost option starting at just $4, per month or $0.00595 per hour. Despite the price, these Droplets provide resources for basic web applications and development projects.
Progressively Higher Resources
As your needs grow DigitalOcean provides a range of Droplet packages with varying levels of resources such, as CPU, RAM, and storage. The advanced packages offer capabilities to meet the performance demands of demanding applications.
Transparent Pricing
One of DigitalOcean’s strengths is its pricing approach. There are no fees or surprises; they clearly display the prices for each package. This makes it simple for users to compare and choose the option that fits their needs and budget.
Choosing the Right Plan
DigitalOcean acknowledges that selecting the plan can be challenging. To simplify this process they offer a document that guides users through making a decision. This resource helps users understand their requirements better and find the plan that aligns with their project demands. Reliability and Performance
Reliability & Performance
DigitalOcean has gained popularity among developers and businesses due, to its reputation for reliability and performance. Let’s take a look at the aspects that contribute to DigitalOcean’s reliability and performance;
High Uptime and Availability
DigitalOcean ensures high uptime and availability through its well-designed infrastructure. By locating data centers across regions worldwide users have the option to select the nearest location for their services. This approach guarantees redundancy minimizing the risk of any downtime.
Solid State Drive (SSD) Storage
All Droplets on DigitalOcean utilize SSD storage offering improvements in data read and write speeds. As a result websites and applications hosted on the platform experience faster application loading times and overall enhanced performance.
Scalability and Resource Management
DigitalOcean provides scalability options enabling users to upgrade their resources as their needs expand. Whether it’s CPU power, RAM, or storage requirements DigitalOceans resource management system allows infrastructure scaling without any downtime.
Performance Tools with Developers in Mind
DigitalOcean offers a range of developer-focused performance tools to optimize applications effectively. Features, like Droplet monitoring, alerts and automated backups empower developers to proactively address any performance issues while maintaining the health of their infrastructure.
Networking Performance
DigitalOceans data centers are connected through a fast and private networking backbone. This allows communication, between Droplets within the data center reducing delays and enhancing the performance of applications and services.
Load Balancers and Floating IPs
DigitalOcean provides Load Balancers that evenly distribute traffic across Droplets ensuring balanced workloads and preventing any one server from becoming overwhelmed. Floating IPs enable failover between standby Droplets ensuring high availability.
Network. and Ddos Protection
To safeguard its infrastructure from DDoS attacks and other threats DigitalOcean implements security measures. Their Cloud Firewalls and private networking options provide a layer of protection for applications and services.
Service Level Agreement (SLA)
DigitalOcean offers an SLA that guarantees a level of uptime for their Droplets and Block Storage. This commitment demonstrates their dedication to providing services to their customers.
Conclusion
In summary, DigitalOcean is a cloud hosting solution ideal for businesses and developers in search of a cost-effective developer-focused platform. With its pricing structure, flexible scalability options, and strong focus on Linux environments DigitalOcean offers a foundation, for hosting a wide range of applications.
DigitalOcean ensures availability and enhanced performance, for users worldwide through its global network of data centers. The platform’s SSD storage, performance monitoring tools, and managed services further bolster its reliability and performance capabilities. However, businesses dependent on Windows technologies may want to explore alternative options.
Ultimately businesses can confidently decide whether DigitalOcean is the choice to power their ventures by carefully considering their individual requirements, technical needs, and future growth plans.
Here are some asked questions (FAQs) about DigitalOcean
1. Is DigitalOcean suitable for beginners?
Yes, DigitalOcean is beginner-friendly with its user interface and comprehensive documentation. However, having some knowledge of cloud hosting and server management can be beneficial.
2. How does the DigitalOceans pricing model work?
DigitalOcean offers a pricing model based on pay, as you go rates or fixed monthly rates. Users have the flexibility to choose from Droplet plans and additional services based on their resource requirements.
3. What operating systems does DigitalOcean support?
DigitalOcean supports a range of Linux distributions including Ubuntu, CentOS, Debian, Fedora, and FreeBSD. Additionally, they provide pre-configured One Click Apps for applications.
4. Is DigitalOcean secure?
DigitalOcean incorporates a range of security measures, including firewalls, private networking, and encrypted data transfer. However, it’s important to note that the security of your applications also relies on their configuration and maintenance.
5. How does scaling function on DigitalOcean?
Scaling on DigitalOcean is straightforward and adaptable. Users have the ability to resize their Droplets to increase resources or utilize the Kubernetes service, for applications enabling horizontal scaling.
6. Is it possible to migrate my existing applications to DigitalOcean?
Absolutely! You can seamlessly transfer your applications to DigitalOcean. The platform offers guides and resources to assist users throughout the migration process.
7. Does DigitalOcean provide backup and data recovery options?
Certainly! DigitalOcean offers solutions, for both Droplets and Managed Databases. Users can conveniently schedule backups. Easily restore data whenever necessary.
In today’s digital world, websites are more than just online shops. They are valuable assets that can make money. Whether you want to start a new business or you already own a website and want to sell it, knowing how to sell a website properly is essential. Just like selling a physical store, selling a website requires careful planning, smart actions, and some creativity to find the right buyers and sell it quickly.
In this guide, we will show you 8 important steps to follow to sell a website easily and profitably. From making your website work well to impressing potential buyers with good information, let’s explore how to sell your website successfully and without any complications!
Step-by-Step Instructions on How to Sell a Website in 8 Steps
Selling a website can be a rewarding venture if done right. It requires a strategic approach and careful execution to attract potential buyers and secure a quick sale. In this section, we will walk you through eight important steps to successfully sell your website.
Step 1: Evaluate Your Website’s Value
Before jumping into the selling process, it’s crucial to determine the value of your website. A well-informed evaluation will help you set a reasonable asking price and attract serious buyers. Consider the following factors:
Website Traffic and Analytics: Analyze your website’s traffic using tools like Google Analytics. Potential buyers will be interested in the number of visitors, page views, and audience demographics.
Revenue and Monetization: Assess your website’s revenue streams, such as advertising, affiliate marketing, or product sales. Provide clear financial records to demonstrate its profitability.
Domain Authority and Backlinks: Check your website’s domain authority and the quality of backlinks it has. A strong backlink profile can increase the website’s value.
Content Quality: Evaluate the uniqueness and relevance of your website’s content. High-quality, evergreen content is more appealing to buyers.
Step 2: Prepare Your Website for Sale
Once you have a clear understanding of your website’s value, it’s time to prepare it for sale. Presenting your website professionally will attract more potential buyers. Follow these steps:
Update Content and Design: Ensure your website is visually appealing and has up-to-date, relevant content. Fix any broken links or errors.
Organize Financial Records: Organize your financial records, including revenue, expenses, and profit margins. Buyers will want to see a transparent financial history.
Compile Traffic Data: Gather detailed traffic data and insights to showcase your website’s popularity and potential for growth.
Secure Intellectual Property: Ensure you own or have permission to sell any copyrighted content, images, or software on your website.
Step 3: Determine the Selling Method
Choosing the right selling method can significantly impact the selling process and the final sale price. Consider these options:
Direct Sale: You can sell your website directly to a buyer. This approach allows for direct negotiation and a potentially quicker sale.
Marketplaces: Online marketplaces like Flippa or Empire Flippers offer a platform to list and sell your website. These platforms attract a wide range of potential buyers.
Brokerage Services: If you prefer professional assistance, consider hiring a website broker who specializes in website sales. They can help you find the right buyers and negotiate on your behalf.
Step 4: Create a Compelling Sales Listing
A well-crafted sales listing is crucial for attracting potential buyers. Your listing should highlight the website’s strengths and potential. Include the following elements:
Introduction: Begin with an engaging introduction that gives an overview of your website and its niche.
Website Description: Provide a detailed description of your website, including its content, purpose, and target audience.
Financial Information: Share relevant financial data, including revenue, profit, and growth potential.
Traffic Statistics: Display traffic data and trends to demonstrate your website’s popularity.
Monetization Methods: Explain how your website generates income through various monetization strategies. Monetization is the most important part of the buyer’s interest. So this should be dealt with properly.
Proof of Claims: Back up your claims with verifiable data, screenshots, and testimonials if available.
Step 5: Market Your Website
Now that your listing is ready, it’s time to market your website to attract potential buyers. Utilize various marketing strategies, including:
Social Media Promotion: Share your listing across social media platforms and relevant online communities.
Email Marketing: If you have a mailing list, send out newsletters with information about your website’s sale.
Search Engine Optimization (SEO): Optimize your sales listing for search engines to increase its visibility.
Paid Advertising: Consider running targeted ads to reach potential buyers interested in your website’s niche.
Step 6: Engage with Potential Buyers
As potential buyers show interest, engage with them promptly and professionally. Be responsive to their inquiries and provide additional information as needed. Consider these tips:
Screen Potential Buyers: Verify the legitimacy of potential buyers and their ability to purchase your website.
Maintain Confidentiality: Protect sensitive information until a serious buyer is identified and ready for negotiations.
Offer Insights: Share growth opportunities and future plans for the website to instill confidence in the buyer.
Step 7: Negotiate the Sale
When you find a serious buyer, it’s time to negotiate the sale. Be open to discussions and remain flexible. Here are some negotiation tips:
Know Your Bottom Line: Determine your minimum acceptable price and be prepared to walk away if the offer doesn’t meet your expectations.
Payment Terms: Discuss payment options, such as lump sum or installment payments, and use secure payment methods.
Transfer of Assets: Clearly outline the assets included in the sale, such as the domain name, content, and any associated accounts.
Legal Documentation: Seek legal advice to draft a detailed sales agreement that protects both parties’ interests.
Step 8: Complete the Website Transfer
Once the sale is finalized, it’s time to transfer ownership of the website to the buyer. Follow these steps to ensure a smooth transfer:
Backup Your Website: Create a full backup of your website, including files and databases, before transferring ownership. A good quality hosting provider will have all the necessary options to take the backup safely and easily.
Domain Transfer: Initiate the domain transfer process to move the domain name to the buyer’s account.
Content and Data Transfer: Provide the buyer with all necessary files, content, and access to tools or platforms associated with the website.
Verify the Transfer: Confirm that the buyer has received everything and the website is functioning correctly under their ownership.
Selling a website involves careful planning and attention to detail. By following these step-by-step instructions, you can increase your chances of selling your website quickly and at a fair price. Remember to be patient and persistent throughout the process, as finding the right buyer may take time.
Final Words
Selling a website can be a lucrative endeavor when approached with careful consideration and diligence. By following the eight important steps outlined in this guide, you can navigate the complexities of the website selling process with confidence and finesse. From evaluating your website’s value to crafting an enticing sales listing and engaging with potential buyers, each step plays a crucial role in ensuring a successful sale.
Remember to present your website professionally, back your claims with data, and explore various marketing avenues to attract the right buyers. Additionally, be transparent in negotiations and seek legal guidance for a secure and smooth transfer of ownership.
While the process may require patience and effort, the rewards of a quick and profitable website sale make it all worthwhile. Embrace the journey with enthusiasm, and you’ll unlock the potential to turn your virtual creation into a tangible success story in the digital marketplace.
Frequently Asked Questions (FAQs)
How do I determine the value of my website?
Evaluating your website’s value involves analyzing factors such as website traffic, revenue streams, domain authority, backlinks, and content quality. You can use online valuation tools or seek assistance from website brokers for a more accurate assessment.
Should I sell my website through a marketplace or directly to a buyer?
The selling method depends on your preference and expertise. Direct sales allow for direct negotiation, while marketplaces offer broader exposure to potential buyers. Working with a website broker can also simplify the process if you prefer professional guidance.
What documents should I prepare for the website sale?
Prepare financial records, traffic data, and any legal documentation related to the website’s assets. Organizing this information will build trust with potential buyers and speed up the sales process.
How can I attract potential buyers to my website listing?
Utilize social media promotion, email marketing, SEO techniques, and paid advertising to market your website listing effectively. Engage with potential buyers promptly and professionally to keep their interests alive.
How do I ensure a smooth transfer of ownership?
Before transferring ownership, back up your website and initiate the domain transfer process. Provide the buyer with all necessary files, content, and access to tools associated with the website. Verify that everything is in order under the buyer’s ownership.
How long does it typically take to sell a website?
The timeframe to sell a website can vary based on factors such as the website’s niche, traffic, and the price you’re asking for. It may take a few weeks to several months to find the right buyer and complete the sale.
Internet Planners LLC, which was established in 1999 has become a known provider of high-quality web hosting solutions and they were affordable. The company was dedicated to delivering services, excellent performance, and user-friendly experiences. Over the years they have made a name for themselves in the growing web hosting industry.
Internet Planners LLC catered, to a range of clients including businesses, large corporations, non-profit organizations, and individuals from all around the world. Their comprehensive suite of technologies and tools ensured seamless website promotion and management empowering clients to succeed in the competitive landscape.
With a track record of excellence Internet Planners LLC was highly regarded for its customer service, which sets them apart from their competitors. As the internet penetration increased Internet Planners remained at the forefront by assisting businesses and individuals in establishing a strong online presence.
Internet Planners LLC Acquired by Exact Hosting
Exciting news emerged in 2021 as Exact Hosting, a major player, in the web hosting industry acquired Internet Planners LLC. Known for their reliable and cost-effective web hosting solutions since 1999 the merger was a great success. This strategic acquisition allowed Exact Hosting to expand its market presence and customer base significantly.
Preparation For Acquisition
After the acquisition Exact Hosting worked diligently in the background to seamlessly integrate Internet Planners LLC into their existing brand. This involved planning and coordination to migrate all customer data and services smoothly onto the Exact Hosting platform. Over a month both companies collaborated to lay the groundwork, for this transition.
Transitioning Brand and Billing
The main objective of this integration was to streamline operations and enhance the customer experience. To achieve this Exact Hosting successfully completed the migration of the Internet Planners LLC brand and billing. This meant that all customer data from Internet Planners was transferred to the Exact Hostings billing system.
Customers can now access their accounts manage billing and receive support through the ExactHosting portal/client area using their login credentials from Internet Planners.
Continued Support for Customers
Recognizing that transitions like these can raise questions and concerns, among customers Exact Hosting assured Internet Planners LLC customers that they would continue to receive support. Any inquiries or issues were encouraged to be addressed to the Exact Hosting support team via [email protected].
The goal was to maintain a level of customer satisfaction and ensure that all customer needs were met throughout the integration process.
The merger, between Exact Hosting and Internet Planners LLC, has brought together two established web hosting companies enhancing Exact Hosting’s market position and expanding its presence. The successful integration of Internet Planners services into the Exact Hosting platform provides customers with a range of hosting solutions and access to technologies and features.
This acquisition showcases how companies in the web hosting industry strive for growth and improvement through partnerships and collaborations. By pooling its resources and expertise Exact Hosting is committed to delivering performance user-friendly hosting solutions, to its diverse customer base while carrying forward the legacy of Internet Planners LLC under its own brand.
Let’s presume that you’ve installed WordPress and the robust WooCommerce e-commerce plugin in order to create your ideal online shop on the best web hosting server. Everything from the product descriptions to the website’s layout to the advertising plan is just right.
The final step in creating a positive checkout experience for your customers. But before that, you must decide what payment gateway should you use. However, with so many choices, how do you choose the best WooCommerce payment gateways for your store?
Well, payment gateways mediate between buyers and sellers, making it possible for them to conduct business online in a safe and hassle-free manner. With more and more online stores using WordPress and its specialized e-commerce plugin, WooCommerce, there has been a rise in interest in secure, feature-rich payment gateways designed just for WordPress.
This article will examine many of the most popular payment gateways for WooCommerce, discussing their capabilities and determining whether or not they are a good fit for your online business.
To help you make a decision that is tailored to your company’s needs, customer preferences, and growth goals, we have compiled a list of the top WooCommerce payment gateways currently available.
Best WooCommerce Payment Gateways for WordPress
Stripe
Stripe Payments is a powerful online payment gateway. The fact that it works with over 135 different currencies and several payment methods makes it stand out. In addition, its extensive developer tools allow you to design a unique and personalized shopping experience.
While Stripe’s Stripe Terminal allows for in-person payments, it’s not necessarily the greatest solution if your firm runs mostly offline. For more specialized businesses like restaurants and stores, there are payment processors like Square that offer services like detailed end-of-day reports and easy inventory monitoring.
Stripe’s flat-rate pricing structure is straightforward and easy to grasp. There are no recurring costs, and you may cancel if it doesn’t meet your needs.
Stripe’s Payment Processing Fees
For online transactions: 2.9% + 30 cents
For in-person transactions: 2.7% + 5 cents
For manual transactions: 3.4% + 30 cents
Stripe’s Payment Methods
Debit cards, credit cards, AliPay, Apple Pay, Google Pay, and many more
Features, Pros, and Cons of Stripe Payment Gateway
Features
Pros
Cons
Simple and easy-to-use integration
Fast and seamless payment processing
Account stability concerns due to occasional account suspensions
Wide range of payment options
Excellent developer resources and documentation
Limited direct customer support options
Robust security and fraud prevention measures
Transparent and competitive pricing structure
Potential for higher transaction fees compared to some competitors
Support for recurring payments and subscription management
Supports global payments and multiple currencies
Some features may require additional development effort to implement
Powerful developer tools and extensive API documentation
Advanced reporting and analytics capabilities
Limited customization options for the payment interface
PayPal Pro
PayPal is one of the oldest and most widely used payment gateways out there. But did you know about PayPal Pro? It’s their business solution, offering a range of benefits.
Setting up PayPal Pro is easy, and the best part is that it’s accessible globally, serving over 200 countries/regions worldwide.
With PayPal’s renowned security measures, you can rest assured that your transactions are well protected. They employ advanced anti-fraud features such as Automatic fraud screening and a reliable Seller Protection Policy.
If you’re using WooCommerce for your online store, PayPal has you covered with their dedicated plugin. It seamlessly integrates with your WooCommerce store, making the setup process smooth and hassle-free.
The best part is that your customers can complete their entire checkout process without ever leaving your site. With everything conveniently happening on a single page, the chances of abandoned carts are significantly reduced.
PayPal’s Payment Processing Fees
For standard debit and credit card payments: 2.9% + 49cents
For digital transactions: 3.49% + 49 cents
For card-present transactions: 2.29% + 9 cents
PayPal’s Payment Methods
MasterCard, Amercian Express, Discover, Visa, and direct bank transfer.
Features, Pros, and Cons of PayPal Pro Payment Gateway
Features
Pros
Cons
Credit and debit card are accepted directly on your website
Wide acceptance and recognition
Higher transaction fees compared to some other payment gateways
Offers a seamless checkout experience
Easy integration with popular e-commerce platforms
Requires a separate merchant account
Supports recurring billing and subscriptions
Access to fraud protection tools
Limited availability in some countries
Provides a secure payment environment
Comprehensive reporting and analytics
Additional fees for certain features, such as chargebacks
Square
Square Payments is Square’s own payment solution that brings mobile payment processing and all-in-one merchant services to the table.
With Square Payments, you get instant setup without any application or approval process.
On top of that, they provide free invoicing software and a mobile payment app, ensuring you have everything you need. Plus, you can enjoy next-day deposits and efficient chargeback management.
While selecting a merchant account or payment provider, Square Payments shines as the most convenient option, especially for new and small businesses. There are no cancellation fees, monthly fees, or chargeback fees to worry about.
Square’s Payment Processing Fees
For online transactions: 2.9% + 30 cents
For in-person transactions: 2.6% + 10 cents
For manual transactions: 3.5% + 15 cents
Square’s Payment Methods
Credit cards, debit cards, Google Pay, Apple Pay, and gift cards (Square).
Features, Pros, and Cons of Square Payment Gateway
Features
Pros
Cons
Easy setup and integration into websites and mobile apps
User-friendly interface and intuitive design
Limited availability in certain countries (primarily US and Canada)
Acceptance of various payment methods
Transparent and competitive pricing structure
Incompatibility with some e-commerce platforms
Inventory management and real-time sales tracking
Strong security measures to protect customer data
Customer support can be slow during peak times
Online and offline payment processing capabilities
Robust reporting and analytics tools
Limited customization options for the checkout process
Customizable checkout experience
Seamless integration with other Square services
Additional fees for advanced features like chargeback protection
Authorize.net
It is a popular payment gateway that is owned another popular company named “Visa”. It assists businesses in accepting e-payments and payments via debit and credit cards.
Authorize.net has two types options available when it comes to its payment processing plans: a combined plan that allows both a payment gateway and a merchant account, and the single plan that allows only a gateway choice. Both options entail a monthly fee, with transaction fees on par with competitors.
Businesses leveraging the Authorize payment processing gateway can accept various forms of payment, including PayPal, debit cards, credit cards, e-checks, and Apple Pay. The company provides 24/7 support to their customers, ensuring assistance whenever it’s needed.
One standout feature of Authorize payment processing gateway is its upfront pricing, which is rather uncommon in the space of gateway providers. This transparency is especially beneficial for small businesses seeking cost visibility without enduring sales pitches or lengthy waiting times on hold.
Authorize.net’s Payment Processing Fees
For online transactions: 2.9% + 30 cents
Authorize.net’s Payment Methods
Discover, MasterCard, Visa, JCB, American Express, Apple Pay, PayPal, Chase Pay, Visa SRC, and E-check.
Features, Pros, and Cons of Authorize.net Payment Gateway
Features
Pros
Cons
Payment processing for credit cards and electronic checks
Established and widely used payment gateway
Additional fees for certain features and services
Recurring billing and subscription management
Robust security measures for safe transactions
Can be more expensive for small businesses with low transaction volumes
Fraud detection and prevention tools
Wide range of supported payment methods
Complex setup and configuration for advanced functionalities
Mobile-friendly payment options
Customizable and scalable solutions
Limited international payment options compared to some competitors
Virtual terminal for manual transactions
User-friendly interface and reporting tools
Some users report occasional technical glitches or downtime
Developer-friendly APIs and SDKs for easy integration
Strong customer support and documentation
Alipay
Alipay is an incredible payment app and digital wallet that makes cashless transactions a breeze. But it doesn’t stop there! Alipay goes beyond being just a payment app.
With a staggering user base of over a billion people, Alipay has become the go-to payment method for those seeking seamless international transactions. The Alibaba group, a prominent player in the eCommerce industry, understands the needs of its global customer base.
That’s why they developed Alipay, their very own online payment system. If you’ve used apps like Venmo or Paypal, you’ll find Alipay’s digital wallet technology quite familiar.
Originally dominating the Chinese market, Alipay has swiftly expanded its reach and popularity to Malaysia, Hong Kong, Singapore, and beyond. The rise of Chinese payment apps has been remarkable, and Alipay stands at the forefront, captivating users worldwide.
Alipay’s Payment Processing Fees
For every transaction of up to RMBY 20,000, a processing fee of 0.55% of the transaction
Alipay’s Payment Methods
Direct bank transfers, debit cards, credit cards.
Features, Pros, and Cons of Alipay Payment Gateway
Features
Pros
Cons
Mobile payment platform developed by Alibaba Group
Widely used in China, making it convenient for businesses targeting Chinese customers
Primarily focused on the Chinese market, which may limit usability in other regions
Supports various payment methods
Offers a user-friendly interface and seamless payment experience
Integration and setup process can be complex and time-consuming for non-Chinese businesses
Offers secure and encrypted transactions
Supports cross-border transactions and international payments
Transaction fees may be higher compared to other payment gateways
Provides integrated marketing and loyalty programs
Provides extensive customer support and dispute resolution services
Limited availability of additional features and customization options
Amazon Pay
Amazon Pay is an incredible payment solution offered by none other than Amazon itself. Your customers can conveniently use their existing Amazon accounts to make purchases on your website, whether it’s for your products or services.
One of the standout features of Amazon Pay is its seamless integration with other Amazon services. It means that customers can utilize their familiar Amazon shopping accounts in external stores. Just think about the vast number of Amazon shoppers out there – tapping into this extensive user base is a significant advantage for any business!
By enabling Amazon Pay, you can effectively tackle one of the most common barriers to completing purchases: abandoned carts. Many customers hesitate when it comes to sharing their credit card information due to trust issues. However, with Amazon Pay, you can alleviate these concerns and boost your conversion rates.
Not only is Amazon Pay user-friendly, but it also comes with cost benefits. There are no monthly fees involved, except for the transaction fees and potential foreign transaction fees for international customers.
Amazon Pay’s Payment Processing Fees
For every transaction: 2.9% + 30 cents
Amazon Pay’s Payment Methods
Credit cards, direct bank transfers, and debit cards with facility of immediate payments, split payments, deferred payments, and recurring payments.
Features, Pros, and Cons of Amazon Pay Payment Gateway
Features
Pros
Cons
Quick and easy checkout process
Trusted brand and widespread recognition
Limited availability in certain countries
Mobile-friendly integration
Seamless integration with existing Amazon accounts
Transaction fees may be higher compared to other gateways
Secure payment transactions
High level of security and fraud prevention measures
Limited customization options for the payment interface
Customer authentication and fraud protection
Improved customer convenience and faster checkout
Reliance on Amazon infrastructure and policies
One-click payment option
Offers buyer protection and dispute resolution
Additional verification requirements for certain transactions
Integration with Amazon customer accounts
Apple Pay
Apple Pay is an exceptional payment gateway developed by Apple exclusively for iPhones, iPads, Apple Watches, and other iOS devices. With Apple Pay, customers can effortlessly make payments in a snap.
The remarkable thing about Apple Pay is its top-notch security measures. For every payment, customers are required to confirm their password, utilize FaceID, or rely on Touch ID, ensuring a secure transaction process that greatly reduces fraud or identity theft.
Just like other remarkable Apple products, Apple Pay boasts a seamless user experience. It’s a perfect choice for those who seek a visually appealing checkout process, adding an extra touch of elegance to their payment experience.
Apple Pay’s Payment Processing Fees
No additional fee
Apple Pay’s Payment Methods
Debit cards, credit cards, and cash option via Apple Cash in United States only.
Features, Pros, and Cons of Apple Pay Payment Gateway
Features
Pros
Cons
Contactless payments via iPhone, Apple Watch, iPad, and Mac devices
Convenient and fast payment method for Apple device users
Limited to Apple device users, excluding Android and non-Apple users
Seamless integration with existing payment systems
Enhanced security through tokenization and biometric authentication
Relies on merchant and app adoption for widespread availability
Secure tokenization to protect sensitive card information
Broad acceptance among various merchants and apps
Requires compatible hardware and software for full functionality
A 5-Step Guide on Selecting the Best Payment Gateway for Your WordPress Website
When selecting the best payment gateway for a WordPress website, consider the following steps:
1. Identify your specific requirements
Determine the specific needs of your business, such as the types of payment methods you want to accept (credit cards, digital wallets, etc.), the currencies you need to support, and any specific integration requirements.
2. Research available options
Explore different payment gateway providers that integrate with WordPress. Some popular options include PayPal, Stripe, Authorize.Net, and WooCommerce Payments. Consider their reputation, security measures, fees, supported countries, and available features.
3. Transaction Fees
Compare the fee of transaction charged by various payment gateways. Evaluate their fee structures, including setup fees, monthly fees, and transaction fees. Consider your business volume and determine which payment gateway offers the most cost-effective solution.
4. Security and Compliance
Pay attention to the security measures provided by the payment gateway, such as encryption, fraud detection, and PCI compliance. Security should be a top priority to protect sensitive customer information.
5. Compatibility with WordPress
Ensure that the payment gateway is WordPress-compatible. Check if there are dedicated plugins available for seamless integration. Look for plugins with good ratings and frequent updates.
The Final Verdict
While selecting the best payment gateway for a WooCommerce store, several factors need to be considered. The ideal gateway should offer competitive transaction fees, be available in your target region, and provide a seamless user experience for your customers.
Considering these aspects, our recommendation for the top payment gateway for WooCommerce is Stripe. It not only ensures a smooth checkout process but also offers a competitive transaction rate. Stripe is widely available in most countries, except for Alipay.
PayPal Pro and Square are other two other popular options, both offering similar features.
Controlling the hosting of a WordPress website is somewhat of a complex task. However, what if you get to do that with a little more than a few mouse clicks? Well, as of now, only a centralized system can help you accomplish that. And that system is cPanel.
Undoubtedly, cPanel is the best tool out there that can make the WordPress hosting of your site easy and efficient. It allows you to control all the facets of a website, including its content, security, website traffic, controlling users, etc.
cPanel is a game-changer for how webmasters manage their servers. It is the most popular and most used web hosting control panel due to its intuitive layout and robust set of functions. However, up to what extent can it be utilized for your site’s WordPress hosting? Let’s find out!
What Exactly is cPanel Hosting in WordPress?
Managing a website’s hosting account is very easy with the web-based cPanel. It is user-friendly and allows the management of a website’s files, the complete domain, the site’s database, connected email accounts, and the security settings of the website.
Many WordPress site owners worldwide use cPanel as their primary control panel. What makes it so popular is its intuitive layout, which is easy to use for both beginners and advanced webmasters.
Key Features of cPanel
1. Security Settings
cPanel allows you to configure various security settings for your website, including managing SSL certificates, setting up password-protected directories, enabling firewalls, and managing IP address access restrictions.
2. Domain Management
You can add, remove, and manage domain names linked with your hosting account. It includes creating subdomains, managing DNS (Domain Name System) settings, and configuring domain redirects.
3. File Management
cPanel allows you to upload, download, organize, and edit files on your website using a web-based file manager or FTP (File Transfer Protocol).
4. Database Management
It provides tools for creating and managing databases, such as MySQL or PostgreSQL. You can create and delete databases, manage user privileges, and access popular database management tools like phpMyAdmin.
Pros and Cons of cPanel Hosting
cPanel is perfect for newcomers seeking a user-friendly solution to manage their websites.
Nonetheless, akin to other hosting control panels, cPanel has its pros and, on the other hand, has cons.
Pros of cPanel
· Compatible with Web Browsers
cPanel works seamlessly with various web browsers like Safari, Chrome, and Firefox. Plus, cPanel goes the extra mile by supporting a range of other applications, including handy website-building tools and essential SEO tools.
· User-friendly
The interface of cPanel is designed to organize a range of features into user-friendly modules, ensuring easy accessibility for users. Navigating the cPanel dashboard is easy, thanks to its intuitive menus and visually appealing graphics.
· Multiple features
With cPanel, you don’t need any advanced technical knowledge to handle complex tasks. It empowers users to effortlessly create FTP accounts and subdomains, manage MySQL databases, and generate reliable site backups.
· Good customer support
The cPanel community offers a wealth of resources and a plethora of information. Additionally, you can access dedicated technical manuals for both cPanel and WHM, which serve as comprehensive guides. These manuals are designed to assist you in understanding how to effectively utilize cPanel products and address any potential issues that may arise.
Cons of cPanel
Data loss risk
Occasionally, you might encounter situations where the cPanel system inadvertently overwrites server configurations and erases all data while undergoing significant updates.
This unfortunate occurrence is often the result of a hard drive crash or failure. Under such circumstances, it becomes imperative to initiate a comprehensive disaster recovery process to successfully reinstate your web server.
Vulnerable Security
The 2FA authentication of cPanel is weak and might be vulnerable to hacking and malware attacks. Regularly updating your cPanel can enhance security measures and protect against such threats.
Using cPanel for a WordPress site: A Step-by-Step Guide
1. Access cPanel
Obtain the login details for the cPanel account from the web hosting provider. Visit “yourdomainname.com/cpanel”.
2. Log in to cPanel
Enter your cPanel login details to log in.
3. Create a database
In cPanel, search for “MySQL Databases” or a similar option. Create a new database by entering a name and clicking “Create Database.” Remember the database name, which you will need during the WordPress installation process.
Create a database user
In the same section, scroll down to “MySQL Users” and create a new user. Set a new username and new password, and click “Create User.”
Assign the user to the database
Get to the “Add User to Database” section. Select the previously created user and database from the dropdown menus, and click “Add.” On the next page, grant all privileges to the user by ticking the “All Privileges” checkbox. Click “Make Changes” or “Add” to save the changes.
Download WordPress
Visit the official WordPress website (https://wordpress.org) and download the latest version of WordPress. Extract the ZIP file that was downloaded to your local computer.
Upload WordPress files
The “File Manager” option may be accessed from cPanel once more. To install WordPress, open it and go to the directory labeled “public_html” or “www” (or the directory you like). To upload the WordPress files you just extracted, click the “Upload” button. When the transfer is finished, you can exit the File Manager.
Install WordPress
Click on your website’s address (www.example.com) in a web browser to access it. Initiating the WordPress installation procedure will be shown to you. Select your language of choice and press “Continue.”
Configure WordPress
The following page will ask for the database details you just established. Indicate the database’s host (often “localhost”), username, and password. If you don’t have a good reason to modify the table prefix, stick with the default. Simply select one of the two buttons labeled “Submit” and “Install WordPress” to continue.
Complete installation
Fill in the site title, desired username, password, and email address to get the WordPress administrator account. Optionally, you can discourage search engines from indexing your site during development. Click “Install WordPress” or “Finish” to complete the installation.
Access the WordPress admin area.
Once the installation finishes, you will see a success message with a link to the WordPress admin area. Click the link or manually visit www.example.com/wp-admin (replace “example.com” with your actual domain).
Explore cPanel features
While WordPress provides its own administration interface, you can still utilize various cPanel features to manage your hosting account, domains, email accounts, databases, and more. You can return to cPanel at any time by accessing your hosting provider’s cPanel login page.
What is the Purpose Does cPanel Serves?
cPanel offers several purposes and functionalities that can enhance the WordPress website hosting experience. Here are some of the main purposes for which you must use cPanel:
1. Website Management
cPanel provides a range of tools to manage the WordPress website. File Manager can upload, edit, and manage files directly on your server. It allows you to create and organize folders, modify file permissions, and quickly edit your WordPress files.
2. Domain Management
cPanel allows you to manage the domain names linked with your hosting account. You can add new domains, create subdomains, set up domain redirects, manage DNS settings, and control domain-specific email accounts. It provides a user-friendly interface to handle all your domain-related tasks.
3. Email Management
cPanel makes setting up and administering email services for your website’s users easy. You may create business-like email addresses (like [email protected]) and forward messages to other addresses. cPanel now has webmail interfaces for checking and managing email from within a web browser.
4. Database Management
Tools for handling your WordPress database are available in cPanel. New databases, database users, and permissions can all be made. You can manage your database tables, run queries, create backups, and restore databases with the help of programs like phpMyAdmin.
5. Security Settings
You can safeguard your WordPress site with the tools available in cPanel. Secure HTTPS connections may be enabled for your site by managing SSL certificates. You may use it to create encrypted folders that only authorized users can access. You may make your hosting environment safer by restricting access to specific IP addresses, turning on firewalls, and managing other security-related settings.
6. Backup and Restore
You may generate full or partial backups of the website using cPanel’s backup and restore features. Scheduled backups can be kept on the server or downloaded to your machine for further security. The cPanel interface makes it simple to restore your website from a backup in the event of problems or data loss.
7. Resource Management
Your hosting account’s resources can be tracked and managed with cPanel’s handy interface. Your website’s CPU, memory, and disk space consumption may all be monitored. It aids in pinpointing the source of any slowdowns in your WordPress site’s performance.
8. Application Installation
WordPress and other popular programs may be installed with a few clicks using a function in cPanel called “Softaculous.” It streamlines the setup procedure and guarantees your WordPress site will be live quickly.
Tips for Securing Your cPanel
To keep your website, data, and hosting environment safe, securing your cPanel is essential. How to achieve that is as follows:
1. Use Strong Passwords
Password-protecting the cPanel account requires special care. Passwords should be difficult to guess; thus, mixing capital and lowercase letters, numbers, and symbols is best. Passwords should be changed often and never shared.
2. Enable Two-Factor Authentication (2FA)
Enable two-factor authentication for the cPanel account if it is supported. 2FA adds extra security by enabling a second verification step, such as a passcode sent to the mobile device.
3. Keep cPanel Updated
Regularly update cPanel to the latest version available. Newer versions often include security patches and bug fixes that address vulnerabilities. Many hosting providers automatically handle cPanel updates, but you should verify that you have the latest version.
4. Manage Access Permissions
Be cautious about granting access permissions to different users and applications within cPanel. Only provide necessary access to specific individuals or services, and regularly review and remove unnecessary privileges.
5. Secure File and Directory Permissions
Ensure that file and directory permissions are properly set to prevent unauthorized access. Follow the principle of least privilege, granting the minimum necessary permissions to files and directories. Be mindful of directories containing sensitive data or configuration files.
6. Use a Firewall
Consider enabling a firewall on your cPanel server to restrict incoming and outgoing network traffic. You can use the built-in firewall features in cPanel or implement a third-party firewall solution.
7. Implement IP Address Restrictions
Configure IP address restrictions to allow access to cPanel only from trusted IP addresses. It adds extra protection by limiting access to the control panel to specific IP addresses or IP ranges.
8. Regularly Backup Your Data
Set up regular backups of the website and databases using cPanel’s backup functionality or a backup plugin. Store backups securely offsite, either on another server or on your local computer. Regular backups can help you recover your data in case of any security incidents or data loss.
9. Monitor Logs
Regularly monitor your cPanel logs for any suspicious activities or errors. Pay attention to access logs, error logs, and security logs to identify any potential security breaches or unusual behavior.
10. Keep Software Updated
Keep all the software, including your website’s CMS (e.g., WordPress) and its plugins/themes, up to date. Regularly check for updates and apply them promptly.
11. Implement SSL/TLS Certificates
Enable SSL/TLS certificates for your website to encrypt communications and secure sensitive data transmitted between your website and visitors. You can generate and install SSL certificates directly from cPanel or use a third-party SSL provider.
Conclusion
cPanel is typically based on Linux web hosting.
It allows access to a wide array of modules, such as Preferences, Files, Databases, Domains, Web Applications, Security, Metrics, Software, and Email.
What sets cPanel apart is its user-friendliness and simple interface, which have cemented it as a prominent option.
Handling a website with cPanel becomes easy. You can effortlessly manage files of your website and carry out various tasks with ease.
We only use essential cookies to ensure that we give you the best experience on our website. Usage of our website denotes acceptance of our use of cookies.Ok